Water in your CCTV camera: the honest guide for Australian conditions.
Internal moisture in an outdoor CCTV camera is one of the most common service issues in our industry. It happens to every brand, and in Australian winter and wet-season conditions it can be persistent. The good news: in almost every case it’s fixable at home. Here’s how, plainly explained.
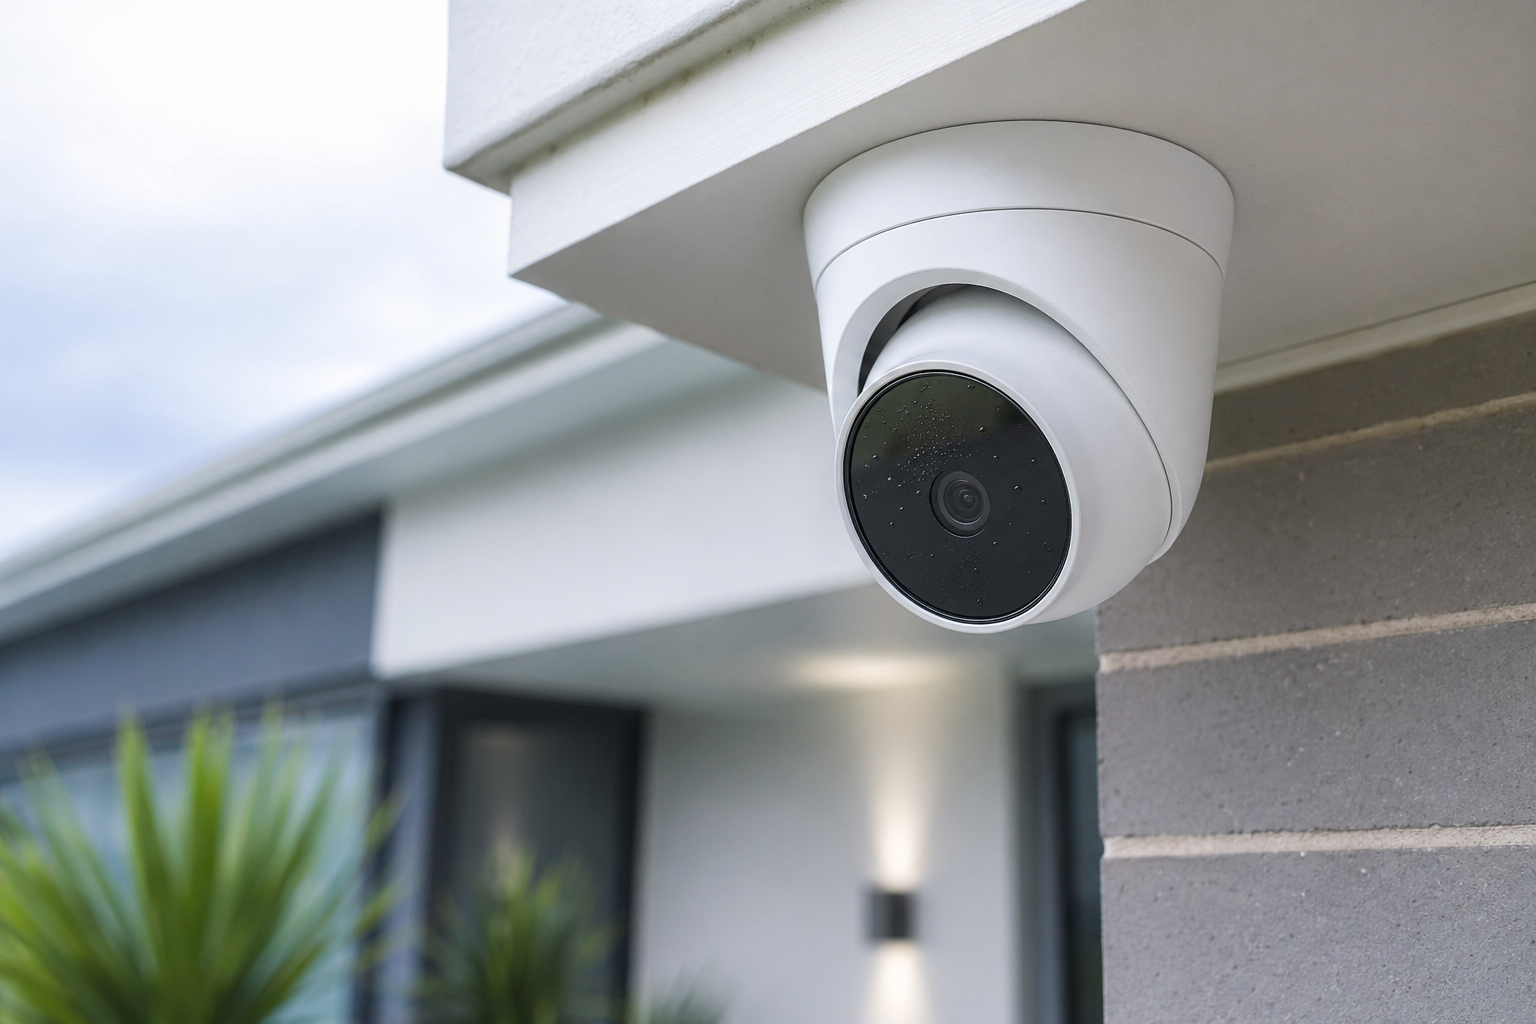
If you’ve found water or fog inside your CCTV camera lens, you are looking at one of the most common service issues in this entire industry — and one of the most fixable. What you can see on the inside of the glass is almost always condensation: the same effect that puts dew on a car windscreen at dawn and fog on a bathroom mirror after a hot shower, just inside a smaller sealed volume of air.
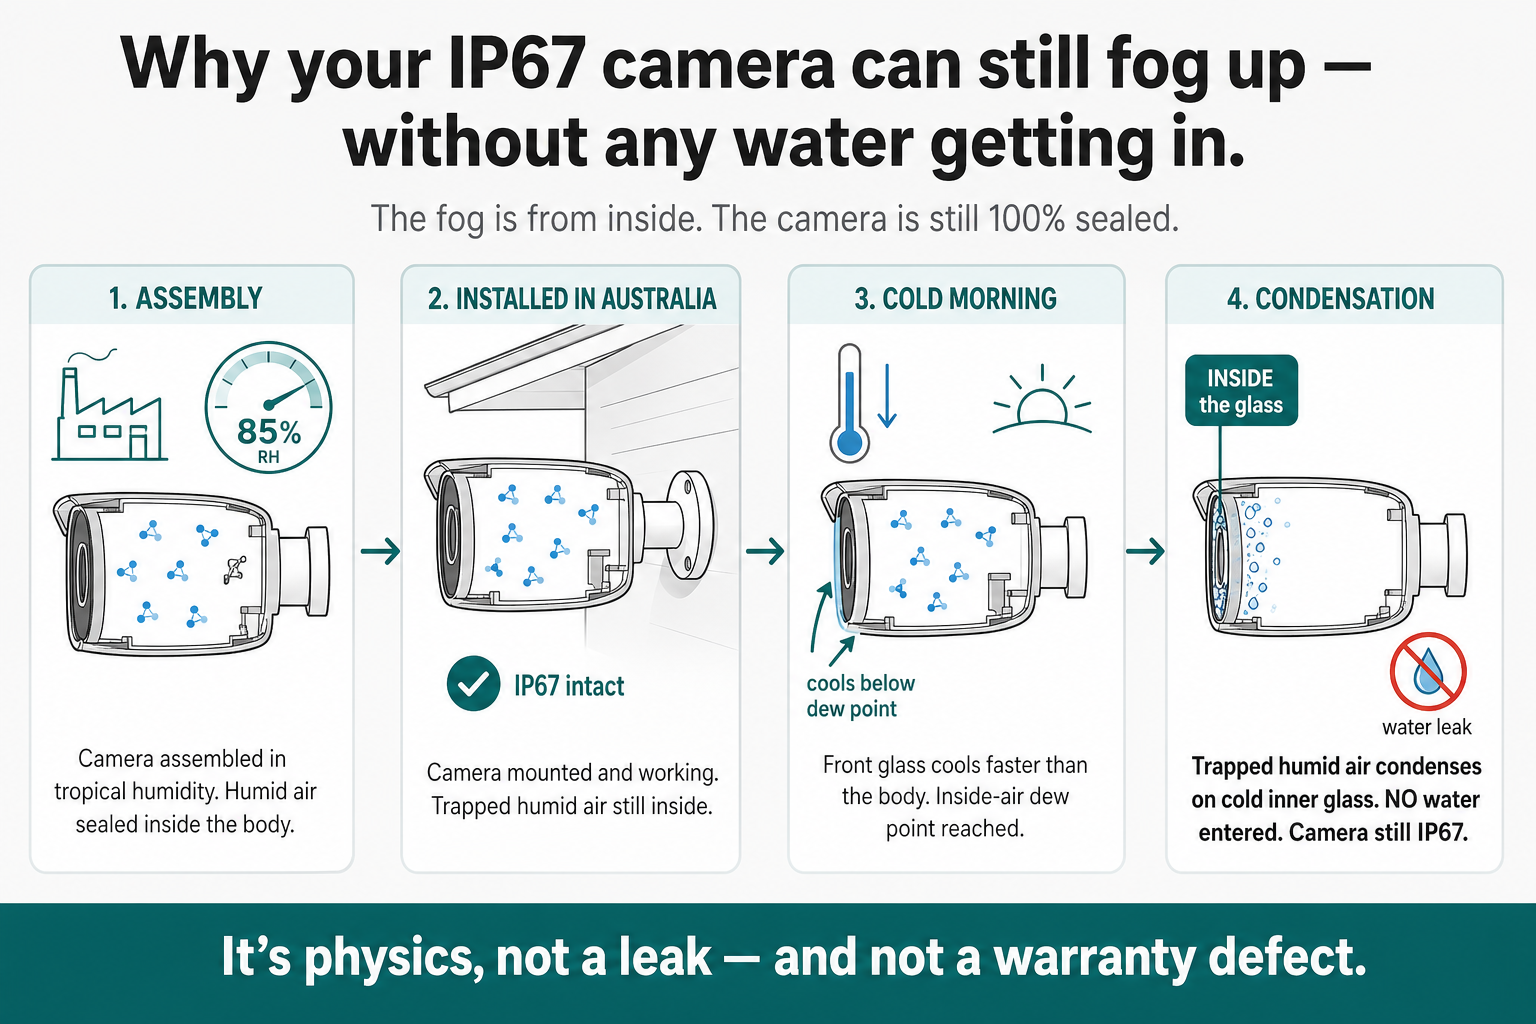
The mechanism is straightforward. A small volume of warm, humid air is sealed inside the camera body when it is assembled at the factory. On a cool Australian night the camera body and the front glass cool faster than the air inside the housing. The front glass becomes the coldest surface in the camera, and when the trapped air drops below its dew point, water condenses on the inside of the glass. By sunrise, you have fog.
Every brand sold in this country sits inside the same envelope. We stock and service the brands you most likely own — Swann, IVSec, VIP Vision, Eufy, Arlo, Dahua, Hikvision and TP-Link Tapo — and we are upfront about it: every one of these brands, premium professional and budget consumer alike, can develop internal fog. The brand on the box doesn’t change what happens; only where the camera is mounted and how it has been maintained do.
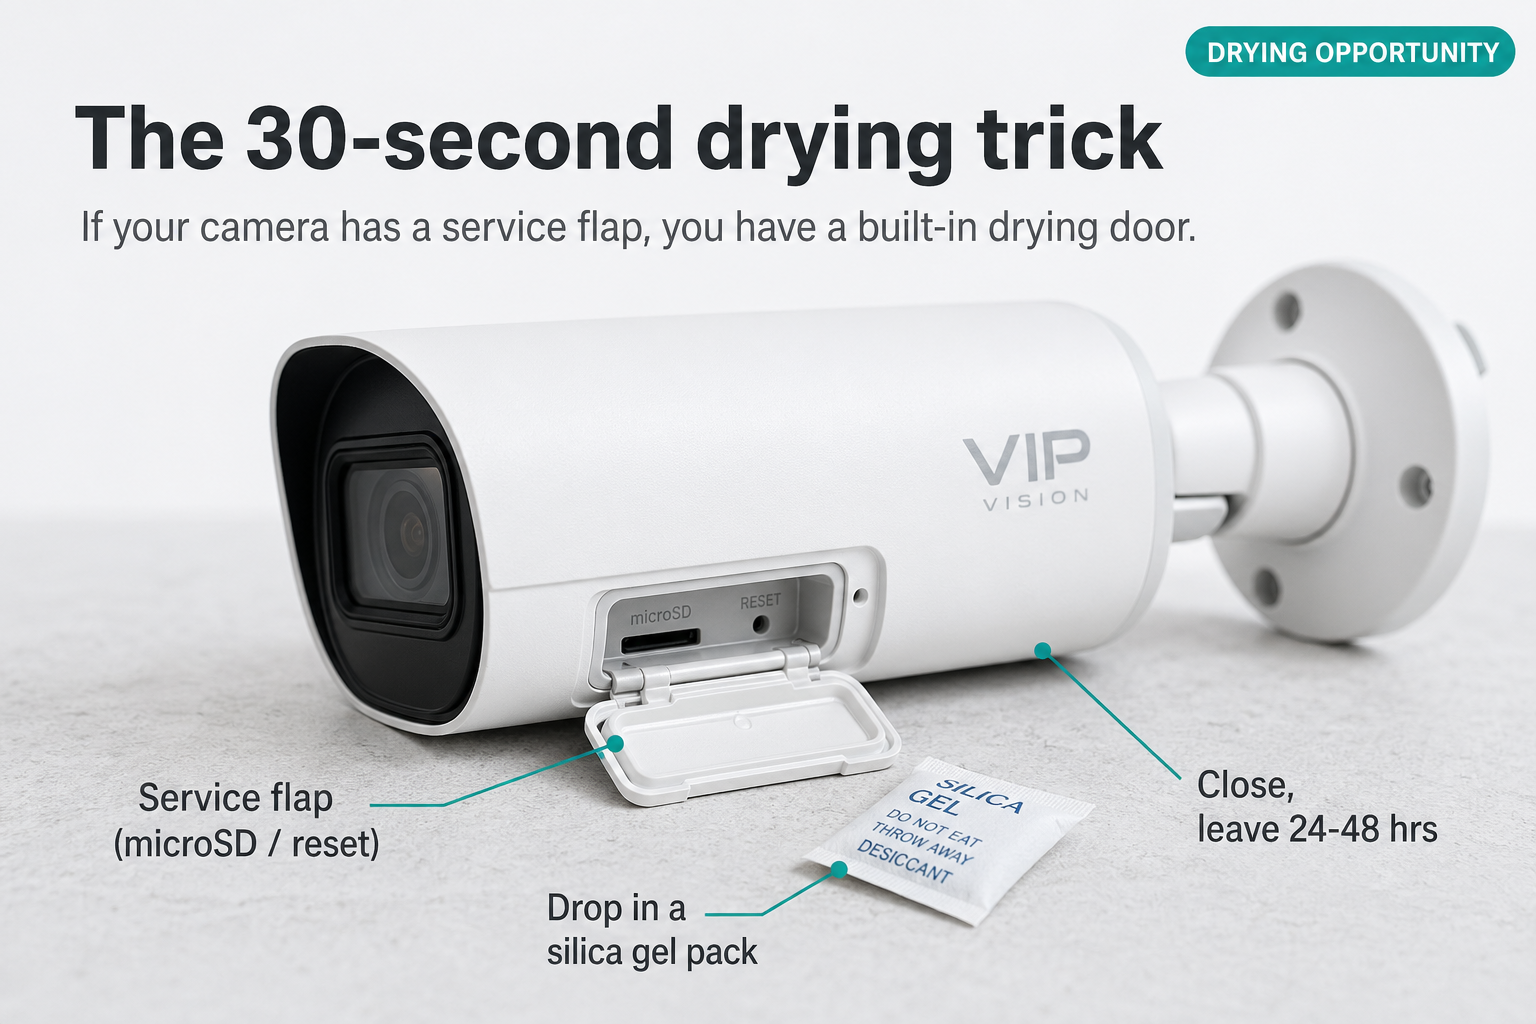
Cameras with a rear service flap for the microSD card or reset button tend to fog sooner than ones without. Every time the flap has been opened — to reset the camera, swap a card, or check a connector — fresh humid outdoor air has been allowed inside the housing, and on the next cool morning that air will condense.
We hear from customers about this constantly, especially through winter and the tropical wet season, so we want to be upfront: the popular “seal the camera in a bag with rice or silica gel for 24 hours” trick is a starting point, not a guaranteed fix. In persistent fog, on cold mornings and in high-humidity environments it often won’t clear the camera, because the silica is working through a sealed housing rather than at the air inside it. The reliable repair is to take the camera down, clean it, open the housing, dry it out properly in a warm dry room over several hours or overnight, and replace or regenerate the silica gel inside before reassembling. The rest of this page walks you through it step by step so you can do it yourself.
Every CCTV camera, every brand, can develop internal fog. The fix is in your hands — this guide walks you through it.
Numbers that matter the facts at a glance
85%+
Factory humidity at assembly
50–65°
Body temp in afternoon sun
30 min
All IP67 actually tests for
17+
Brands with documented notes
90%+
Recover with proper drying
5–7 yrs
Typical seal life in Australia
The dew-point story how the fog forms
The mechanism is identical to dew on a windscreen at dawn. Through the day, the camera body and the air inside it warm up under sun load. After sunset, the body radiates heat away to the cool night sky, and the front glass — with no insulating shield in front of it — loses heat fastest. By around 4am the front glass is the coldest surface in the housing. When its temperature drops below the dew point of the trapped air inside, water condenses on the inside of the glass, and by sunrise you can see fog.
The fog forms inside the camera from air sealed in at the factory — the same air, every cool morning.
How this fits with the IP rating
The IP66 / IP67 rating is real and meaningful: it measures water entering from outside in a controlled laboratory test, and a passing camera will keep external rain and spray out. What the rating doesn’t cover is the small volume of humid air sealed inside the housing condensing on cool glass — that’s a separate physical event the test isn’t designed to address. The same camera can be fully IP67-rated and still develop internal fog over time.
First, observe before you touch a quick triage
Before you reach for a screwdriver, spend a day watching the camera. The pattern of the fog tells you what kind of problem you have, and what fix it needs.
Capture the symptom
Take a screenshot of the live feed at 6am, midday and dusk. The pattern matters.
Watch through the day
Light fog that clears as the sun warms the housing is the easiest case. Persistent fog is harder.
Decide your route
Cleared by midday? Just monitor. Still foggy 48 hrs later? You need the proper fix below.
Be honest with yourself. If you’re seeing fog every morning through winter, sealing the camera in a bag for a day will not fix it long-term. The trapped humid air needs to be physically removed and replaced — that means opening the housing.
When it gets worse winter & the wet season
Internal moisture in CCTV cameras is genuinely seasonal. Two periods of the Australian year send our service email volume up several times over.
Australian winter (May–August)
Cold clear nights radiate heat away from the camera body to the night sky. The front glass routinely drops below the dew point of the trapped indoor-temperature air, and you wake to fog every morning. The sealed-bag trick rarely keeps up — the camera fogs again the next night because the seals haven’t been opened to swap the air.
What works: open the camera, dry it out, regenerate or replace the silica gel, and reassemble in a warm dry room. The dry air sealed in is what stops the cycle.
Tropical wet season (Nov–April)
Northern Australian relative humidity sits at 90%+ for months. Every time a camera is opened — including just removing the SD-card flap — that humid air rushes into the housing. Daily heat-cool cycles then drive condensation on the inner glass. Bag-and-rice methods are fighting the climate.
What works: open and dry the camera in an air-conditioned room with low humidity, replace the silica gel and seal the housing while the indoor air is at its driest.
The proper fix open it, dry it, regenerate the gel
This is the reliable repair. It takes about 30 minutes of hands-on work plus several hours (or overnight) of unattended drying. Done correctly, it clears almost every camera and gives you another year or two of trouble-free service.
Before you start — safety first
Power the camera down at the NVR or PoE switch first. Let a sun-baked camera cool to room temperature before you open it — opening a hot camera into cool indoor air actively makes condensation worse. No hair dryers, no ovens (for the camera itself), no microwaves. A warm dry room and patience are all you need.
Power down
Disconnect the camera at the NVR or PoE switch end. Don’t just unplug at the camera.
Take it down
Bring the camera indoors to a warm dry room (ideally air-conditioned, 22–26°C, low humidity).
Clean the body
Wipe the housing, lens cover and rear cable with a clean microfibre cloth. Remove any cobwebs, dust and salt residue.
Open the housing
Service flap if there is one; otherwise unscrew the front bezel, the rear cap, or the ball joint. Photograph each step.
Find the silica pack
Usually a small white sachet inside the rear of the body. Leave it where it is — it dries with the camera.
Air-dry overnight
Leave the camera open in a warm dry room for several hours, ideally overnight. The silica pack inside dries out alongside the housing.
Check the gel pack
Heavy, soft, sour-smelling or visibly contaminated? Replace it. Otherwise it’s now dry and ready to go back in.
Re-grease & reassemble
Thin film of dielectric or silicone grease on the front O-ring. Hand-tight only — over-tightening cracks the threads.
Re-mount carefully
Under an eave wherever possible. Add a clean drip loop on the cable. Watch the next two mornings.
Tips that actually help
The overnight dry-out regenerates the silica pack for free. Leaving the camera open in a warm dry room dries the pack inside it at the same time. There’s no separate “regeneration” step needed for the standard fix.
Run a dehumidifier in the same room while the camera is open — it’s the single biggest accelerator of drying. An air-conditioned bedroom on a winter night does almost as well.
Indicating silica gel (the orange or blue beaded type) is worth the small extra cost — it changes colour when saturated, so you can see at a glance whether the pack inside the camera is doing its job.
Pre-saturated, contaminated or unknown packs are the one case for oven-drying: lay them on a baking tray at around 100°C for 2–3 hrs to drive moisture out before reuse. For a normal in-camera dry-out you don’t need to do this.
Don’t use rice as the desiccant. It works in a pinch on a phone for an hour, but for an outdoor camera in winter it’s nowhere near aggressive enough.
If the camera fogs again within a week, the seal is the issue (not just trapped air) — replace the front O-ring or get the camera serviced.
That’s the whole repair
Most customers do this in a couple of hours over a weekend with a screwdriver, a microfibre cloth and a warm dry room overnight. The next sections cover the install changes that stop the problem coming back — mounting matters, common mistakes, and what the IP rating really tells you. Getting those right is the difference between drying the camera once and doing it every winter.
The service flap — a quiet vulnerability where humid air gets in
Many modern cameras (VIP Vision, Dahua, Hikvision and most premium ranges) include a small rubber service flap on the body for the microSD card and the reset button. It’s a useful feature, but it’s worth understanding what it actually is and what it isn’t.
What the flap is for
The flap is sized for a microSD card slot and a small reset pinhole — nothing more. It’s not a service door, and the recess behind it is too small to fit a silica gel sachet. Don’t try to drop a desiccant pack in through the flap; you’ll either crush it against the SD-card slot or leave it half-pinched under the rubber boot, which then can’t reseal.
Drying the camera is a job for the main housing — covered in the proper-fix section above. The silica gel sachet that came with the camera lives inside the body, and that’s where any drying or replacement happens.
The real role of the flap: it’s how humid air gets in
Every time the service flap has been opened — to insert an SD card, hit the reset button, or check a setting — fresh humid outdoor air has rushed into the housing. On a humid day or in the wet season, that single one-minute opening can be enough to start the fog cycle on the next cool morning. The flap rubber itself is also a smaller, weaker seal than the main housing O-ring, and once it has been opened a few times it never re-seats quite as cleanly.
Practical rules: only open the flap when you actually need to. When you do, do it indoors in an air-conditioned room where possible. Reseat the rubber boot carefully, evenly all the way around, and don’t pinch the cable inside it. A camera that’s been opened at the flap on a humid day is a prime candidate for the next morning’s fog.
Mounting decides everything where you put it = how long it lasts
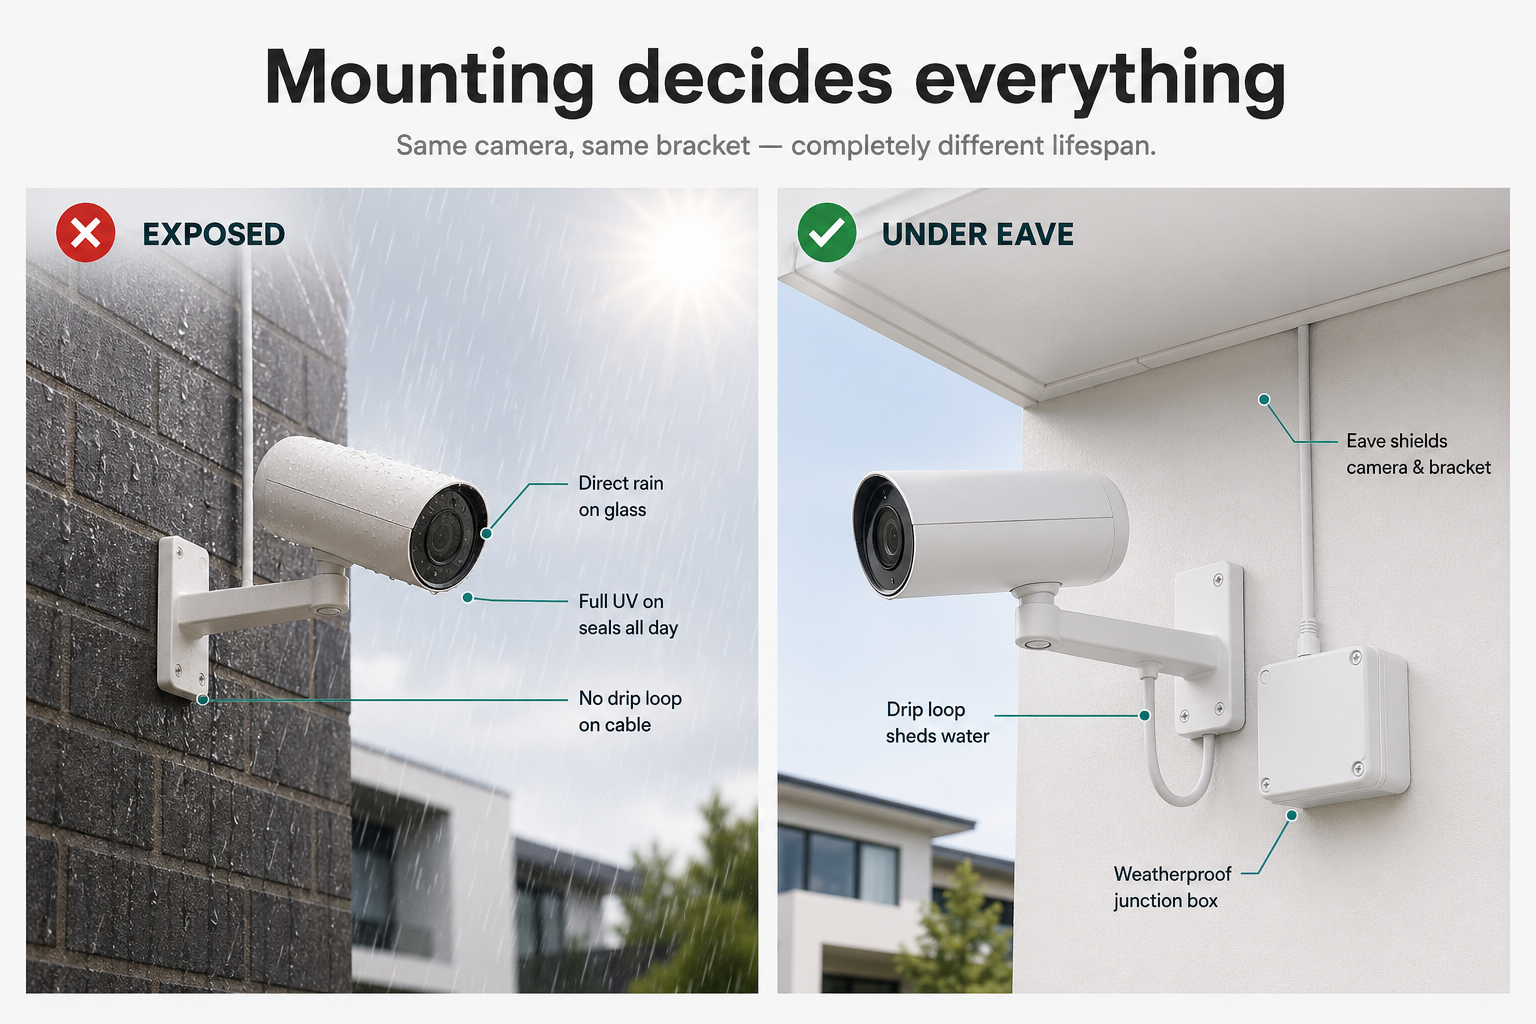
Same camera, same bracket, two completely different lifespans. An exposed wall mount means the camera takes the full hit of every storm, every UV cycle and every dust event. Tucked under an eave the same camera runs trouble-free for years.
Same camera, same L-bracket. The eave is doing the work that the IP rating cannot.
The three rules that decide everything
Mount under an eave wherever physically possible. The eave does more for camera life than any IP rating.
Run a drip loop — cable forms a U below the camera so water drips off, not in.
Use a weatherproof junction box on the wall behind the camera. Keeps the connector dry and serviceable.
Common install mistakes that age a camera fast
Cable forced back into the body. The rear flap or boot didn’t re-seat — now it’s your weakest seal.
No drip loop. Water tracks down the cable straight into the rear connector.
Connector exposed to weather. RJ45 sitting in the open instead of in a junction box.
Pressure-cleaning the camera. Domestic gurney pressures exceed the IP66 test conditions.
Removing screws without sealing washers. Re-fitting without the original O-rings invites slow leaks.
Over-tightening on reassembly. Cracks the plastic threads and creates new ingress points.
Sealing the body seam with silicone. Looks tidy — ruins the next service. Don’t.
Mounting on a fully exposed wall. No eave = full UV, full rain, full dust. The seals will age years faster.
IP66 / IP67 — what it actually covers snapshot test, not a guarantee
It’s worth knowing exactly what an IP rating measures, because it’s often quoted as if it means “waterproof forever”, and that’s not how it works. An IP rating is a short controlled laboratory test, on a brand-new factory-sealed sample, against water entering from outside. It’s a useful baseline at the time of manufacture — it tells you the camera was built to resist external rain and spray. It is not a long-term warranty against environmental wear, and it doesn’t test for the small volume of humid air sealed inside the housing condensing on cool glass.
IP66
Sprayed with high-pressure water from every angle for a few minutes. Pass = no harmful water entry during the test.
IP67
Submerged in 1 metre of fresh water for 30 minutes. Pass = no harmful water entry during the test.
What IP ratings do not cover
Trapped factory humidity condensing on the inside of the glass.
UV-aged seals — a year of Australian sun changes the rubber.
Thermal cycling — ten thousand heat-cool cycles compress every gasket.
Salt air, dust abrasion, hail, wind-driven rain.
A rear flap left open or seated incorrectly during install.
Pressure-cleaner or hose-down damage.
The rating still holding 5–7 years later.
Every brand — including ours we sell these too
It’s natural to wonder whether switching to a different brand would have avoided the issue. The honest answer is no — we’ve seen this across every range we’ve ever sold. Internal fog isn’t a brand-quality signal; premium professional cameras and budget consumer cameras condense on cool mornings for exactly the same physical reason.
Brands we stock and sell — same physics, no exceptions
We carry these brands in Australia and we’re upfront about it: every one of them can develop internal moisture for the reasons covered above. We’d rather tell you that on this page than have you swap a fogged camera for a different brand expecting a different outcome.
SwannIVSecVIP VisionEufyArloDahuaHikvisionTP-Link Tapo
Documented across the wider industry too
Many other brands, including premium professional ranges that aren’t in our catalogue, have published their own customer-facing service notes on internal moisture. Hikvision, Swann and Reolink each have official guides, and the issue is openly discussed by Bosch, Axis and Hanwha (Wisenet) in their professional installer documentation.
Every product we sell carries the consumer guarantees set out in the Australian Consumer Law. Those rights apply regardless of any manufacturer warranty period and cannot be excluded. If a camera has a genuine manufacturing defect, isn’t fit for the purpose it was sold for, or doesn’t match its description, we’ll work with you to repair, replace or refund — whichever is appropriate to the case.
Internal moisture in cameras is one of the trickiest categories to assess, because the same physical symptom (water or fog inside the lens) can have very different causes. Below is how we typically classify cases, set out plainly so you know what to expect when you contact us.
Most cases we see are environmental rather than manufacturing-related — that doesn’t mean we can’t help. We can almost always repair or service the camera, and we’ll quote any work before we start it. The split below is a guide to what we’d typically treat as a warranty replacement vs a service / cleaning case.
Typically warranty cases
DOA or fails within hours of installation.
Pigtail or moulded cable joint splits in normal use early in life.
Cracked housing or split body seam out of the box.
Sensor, IR ring or firmware fault with no environmental cause.
Board-level failure not attributable to the install location.
Visible assembly fault on opening (e.g. unseated O-ring from new).
Persistent internal moisture from new, despite a sheltered install.
Typically service / clean & dry cases
Internal fog or condensation that clears as the camera warms each morning.
Camera that ran fine for 12+ months then began fogging on cool mornings.
Water tracked down the cable into the connector with no drip loop.
Seal degradation after years of fully-exposed outdoor service.
Hail, storm, pressure-cleaner or coastal salt-air damage.
A rear service flap that has been opened, reset or reseated incorrectly.
Genuine warranty case? Send us the details
If you’ve worked through the dry-out guide above, the symptom hasn’t cleared, and you believe the camera has a manufacturing defect rather than environmental wear, that’s when we step in. Send a photo of the inside of the lens through the contact form together with how long you’ve had the camera and how it’s mounted. We’ll review it against the cases above and reply with a straight answer.
Honest answers FAQ
Is water inside my CCTV camera always a fault?
No. Water or fog inside the lens of an outdoor CCTV camera is one of the most common service issues across the entire industry, and the cause is usually physics rather than a manufacturing defect — humid air trapped at the factory condensing on the inside of cool glass. The vast majority of cases are recoverable at home by drying the camera out properly and replacing or regenerating the silica gel inside.
Will the camera dry itself out if I leave it overnight?
Sometimes — but honestly, in Australian winter and through the tropical wet season, often not. Light fog that burns off as the sun warms the camera is fine to leave alone. Persistent fog that returns every cool morning will not clear by itself, because the same humid air is sealed inside and re-condenses every night. Those cameras need to be opened, dried in a warm dry room, and the silica gel inside replaced or regenerated before reassembly.
Does the “seal it in a bag with rice or silica gel for 24 hours” trick actually work?
It can, for very light fog. We’ll be straight with you though — in winter and in high-humidity conditions it often won’t fully clear a camera, because the silica is working through a sealed housing rather than at the air inside it. The reliable fix is to open the housing, dry it out in a warm dry room over several hours or overnight, and replace or regenerate the silica gel inside before reassembly.
Why does fog appear inside the lens even though the camera is rated IP66 or IP67?
IP66 / IP67 are short controlled laboratory tests under IEC 60529 on a brand-new sealed sample. They do not test for years of UV, salt air, thermal cycling, hail or seal aging — and they don’t cover humid air sealed inside the camera at the factory. A camera can be genuinely IP67 on day one and still develop internal fog later, because the cause is trapped air condensing on the inside of the cold glass, not water leaking in from outside.
What about cameras with a rear service flap for the SD card or reset button?
It’s worth knowing what the flap actually is. It’s a small rubber cover sized for a microSD card slot and a reset pinhole — it’s not a service door, and the recess behind it is too small to fit a silica gel sachet. Don’t try to drop a desiccant pack through the flap; the actual silica lives inside the main housing and is dried or replaced from there. The flap’s real significance for moisture is that every time it’s been opened to insert an SD card, hit reset, or check a setting, fresh humid outdoor air has been allowed inside the housing — and on cool mornings that air condenses on the front glass. Only open the flap when you have to, do it indoors where you can, and reseat the rubber boot carefully.
How do I properly dry out a camera that has water or fog inside it?
Power the camera down at the NVR, take it off the mount, and bring it indoors. Wipe the body and lens cover. Open the housing by undoing the small Phillips/Torx screws around the front bezel, rear cap, or ball joint. Leave the silica gel sachet inside the body where it is — it dries out alongside the housing. Stand the camera open in a warm dry room for several hours, ideally overnight, with a dehumidifier or air-conditioner running in the same room if you have one. By morning both the housing and the silica pack will have dried out together. Inspect the pack: if it’s heavy, soft, sour-smelling or visibly contaminated, replace it; otherwise it’s now ready to go back in. Re-grease the front O-ring lightly with dielectric or silicone grease, reassemble hand-tight only, and re-mount under an eave with a drip loop.
Do I need to oven-bake the silica gel pack to regenerate it?
Not for the standard fix. Leaving the camera open overnight in a warm dry room dries the silica pack inside it at the same time it dries the housing — you get the regeneration for free. Oven-baking (around 100°C for 2–3 hrs on a baking tray) is only worth doing for packs that are pre-saturated, contaminated, or out of an old camera you can’t currently service. For a normal in-camera dry-out, the warm dry room does the same job without an oven.
Which CCTV brands are affected?
All of them. Hikvision, Dahua, Uniview, Axis, Bosch, Hanwha (Samsung Wisenet), VIP Vision, Reolink, Lorex, Swann, Ring, Arlo, Eufy, Nest, Wyze, TP-Link Tapo and Annke are all subject to the same physics. Hikvision, Swann and Reolink each publish their own customer-facing service notes on this exact issue.
Can a camera with water inside be saved, or is it a write-off?
In our experience the vast majority are recoverable. A camera is usually only a write-off when sustained moisture has reached the main board and caused visible corrosion, when the lens has developed fungus, or when the housing itself is cracked. If you’re unsure, send us a photo of the inside before you discard anything — we can usually tell at a glance whether it’s worth drying or replacing.
Is water ingress or internal fog covered by warranty?
It depends on the case. Australian Consumer Law applies to every camera we sell, and a genuine manufacturing defect — a camera that fogs persistently from new, a cracked housing, an unseated O-ring out of the box, a sensor or board-level fault — is something we’ll repair, replace or refund. Environmental cases — a camera that ran fine for a year then started fogging in winter, a camera installed on an exposed wall, water that has tracked down a cable with no drip loop — are usually a service rather than a warranty matter. Either way, contact us before you write the camera off; we’ll give you a straight answer.
Worked through the guide and still stuck?
If you’ve attempted the dry-out and the camera still has persistent fog, or you’re seeing visible corrosion or fungus on the inside, that’s the point at which a real conversation helps. Send us a photo of what you’re seeing inside the camera with a quick description of how it’s mounted — we’ll tell you whether it’s worth another dry-out, a service, or a replacement, and we’ll quote any work before we start it.
General information only. This page summarises the common causes of internal moisture in outdoor CCTV cameras, the limits of IP66 / IP67 ratings, and customer-side preventive practice. It is not a formal engineering report or warranty document. Outcomes vary by model, install conditions, environment and operating history. Australian Consumer Law applies for genuine manufacturing defects regardless of anything stated on this page.
You need to login or create account
Save products on your wishlist to buy them later or share with your friends.
Or login with
Log in using your social account
Google
New to InFront?
Create an account for faster checkout, order history, and dedicated support.